Learning Outcomes for RHS Level 2 R2111 (Understanding Garden Features, Plant Selection and Planning) :
”Describe how to carry out a basic linear survey including the use of tapes, offsets and triangulation.”
In this instance (at level 2) the terms triangulation and trilateration are synonymous. This is a focus on LINEAR surveying i.e. the position of boundaries, soft and hard landscaping features at ground level within the garden and does not include the heights of features or contours as that is LEVEL surveying.
A range of equipment required for carrying out a linear survey
- 2 surveyor’s tapes (minimum 30m in length).
- Skewers / metal pins to firmly fix tapes.
- Metal tape measure (with ability to stop it retracting).
- Wooden or metal pegs for datum points
- Notepad and pencil
- Squared / gridded paper.
- Clip board with waterproof cover.
- Builders square to check right angles.
- String line (with as little stretch as possible). or Laser tape measure
Linear Measuring Techniques
Overview
- Using a tape to take measurements
- Triangulation
- Offset measurements
1. Using a tape to take measurements
Surveyors tapes are used for linear measurements. They are made from non-stretchable material (fibreglass) for accurate readings. Usually tapes which are 30m long are fine for the average sized garden, but tapes up to 100m can be sourced for larger gardens.
Direct Measurements
A tape may be used to take a direct line measurement where the tape measures the distance from A to B. This is a method used when using the triangulation method (See later)
Running Measurements
A tape may be used to measure several features along a single line e.g. position of windows and doors along a house wall. These are called running measurements. The tape is secured along the back of the house and measurements are taken cumulatively without moving the tape. For accuracy, the tape is anchored at regular intervals, especially if windy. Running measurements could also be taken along a fence to indicate the position of shrubs which have been planted next to the fence for example.
Running measurements are also recorded along a tape when taking a series of offset measurements. (see later)
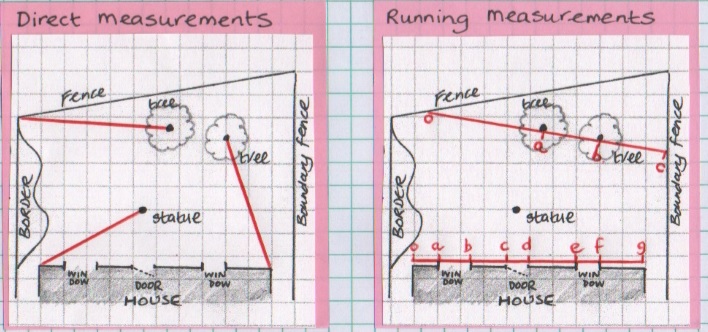
Above left: Simple direct line measurements are shown in red. Above right: 2 examples of running measurements (in red) which are cumuliative, starting at zero, then recording running measurements at a,b,c,d,e,f,g etc.
2. Triangulation
Triangulation is used to determine a location using more than one linear measurement. Usually gardens are not square or rectangular even though they may appear so. We cannot assume that the angles at the corners of what appears to be a rectangular garden are right angles. If they were, then it would be easy to transfer measurements to a plan as we would measure the lengths and draw them at right angles to each other.
Triangulation is used to pinpoint things like the corners of the garden, the position of a tree or a statue for example.
Step by step triangulation
1. First of all we need to establish a BASELINE
A baseline is a line from which other measurements are taken and is usually between 2 points that are static like the corners of each side of the back wall of the house or the 2 corners of the far boundary. We can also establish new baselines in other areas of the garden which may be useful when there are obstacles which prevent direct line measurements being taken from the back of the house.
2. Once the baseline is established we then take 2 linear measurements from each end of the baseline to locate the position of a tree or corner of the garden.
3. These measurements are recorded. Where two points are established (at each end of a baseline – eg the ends of a house back wall), you can find the third point (a tree) in relation to them by using the principle of a triangle.
So by knowing the lengths of the 3 sides of a triangle we can plot the exact location of features that are at the corners of these triangles. For better accuracy larger triangles work best.
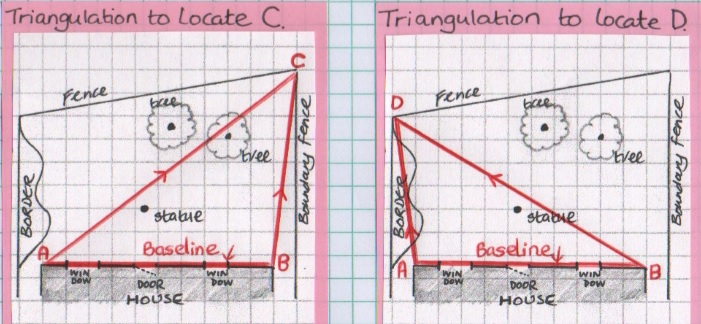
To locate the far corners of the garden (points C and D) 2 separate sets of triangulation measurements are taken from the baseline.
To understand how triangulation works we need to explain how the measurements are transferred to the plan. Referring to the plan above this is how the triangulation measurements are transferred to the paper once you get back to the drawing board.
Draw a line to represent (to scale) the baseline measurement (A-B)
Set the pencil and compass point distance on the scale ruler to the distance A-C (eg 5m being 5cm). Let’s say that AC is 25.5 m (25.5cm)
Put the point of the compass at A and make an arc with the pencil at that distance (A-C).
Set the pencil and compass point distance on the ruler to the distance B-C. Let’s say that BC is 18m (18cm)
Put the point of the compass at B and make an arc with the pencil at that distance (B-C).
Where these two arcs intersect is the true position of point C in relation to A and B.
We have found the position of C using triangulation.

3. Offset Measurements
Offset measurements are used to map the position of features by taking measurements at right angles to an established baseline. In this case we do have a linear measurement and an angle. Offset measurements are usually used for the finer detail of the survey such as fixing the position of a curved border or path or locating the position of a group of trees in an orchard area of the garden for example.
Step by step offset measurements
1. First of all we need to establish a BASELINE
As we stated when we covered triangulation, a baseline is a line from which other measurements are taken and is usually between 2 points that are static like the corners of each side of the back wall of the house or the 2 corners of the far boundary. ‘New’ baselines can always be made, as long as we can transfer the position of the baseline to the plan. For offset measurements we often establish new baselines in other areas of the garden which are nearer to the detail being measured by offset measurements.
2. Running measurements are recorded along the baseline
The offset measurement is going to be taken from the unknown point to the baseline. Often a few regularly spaced offset measurements are taken along the baseline. These will be recorded as running measurements (see earlier) along the baseline.
3. Individual offset measurements are recorded
Each offset measurement length from the unknown point to the baseline is then taken and recorded. It is essential that the angle between the tape and the baseline is 90° as we need an angle and a length to be able to transfer the information to the plan.

Running measurements are taken along the RED baseline at the position of each offset. Offset measurements (GREEN) are taken and recorded. Where the offet meets the baseline has to be at a right angle.
Methods to ensure that the angle between the offset measurement and the baseline is a right angle.
Swing the tape until you see the shortest measurement
Take offset measurements from the feature to the baseline by placing the tape 0 at the feature and swing the tape where it meets the baseline until the shortest measurement is noted.

The right angle can be checked by placing a builders square on the baseline to check it is at a right angle.
Al;ternatively a 3,4,5 triangle can be set out using a tape to establish a right angle.

Tips for measuring accurately
Keep the tape taught and peg it down so it does not move, especially when doing running measurements.
Make sure offset measurements are at right angles to the baseline by using the swing technique or 3,4,5 traingle.
It really helps if there are 2 people doing the survey so that the tape can be repositioned effectively and kept taught.